Getting the Best Rate on Foreign Currency

US, Chinese, and Japanese Currency

One of the unique things to think about when travelling internationally is the logistics of foreign currency. In America the majority of stores and restaurants will accept credit cards, but that is not always the case. In many countries cash is king, and being stuck without cash on hand could be extremely problematic. That is why it is crucial to know how and where to get local currency. Equally as important, you need to know how to get the best exchange rate when purchasing foreign currency.

Paying with a Credit Card (in the Local Currency)

Often the best exchange rate you will get comes directly from the major card issuers. Visa, MasterCard, and American Express all calculate their own exchange rates, and often they are the best rates available. The rates between the three issuers are often very close to one another, although MasterCard often has a slight edge. When you make a purchase with your credit card, as long as the merchant charges in the local currency, you benefit from the exchange rate calculated by your card’s issuer.

Aside from the card issuer, you also have to consider the bank that issued you the card in the case of Visa and MasterCard. Many cards will charge a small fee on every purchase made in a foreign currency. 3% is a common fee, and while it appears small, it can add up significantly over the course of a vacation. That being said, there are a large number of cards that do not charge any foreign transaction fee. It is a very good idea to have at least one card in your wallet that does not charge a foreign transaction fee.

Using a Debit Card in a Local ATM

Just as with credit cards, debit cards use the exchange rate set by the issuing bank, almost always Visa or MasterCard. It is very important, however, to choose the local currency if the ATM gives you a choice. If you use an ATM in China and request US Dollars, for example, the ATM determines the exchange rate. This rate will often be significantly worse than the direct rate offered by the card issuer. This also gives you the great benefit of having local cash, in case the need should arise.

Also like credit cards, there are fees that can be charged depending on the bank the debit card is attached to. Although not as common as credit cards with no foreign transaction fees, there are a few banks that do not charge any withdrawal fees for using out of network ATMs. A few banks will even reimburse you for any fees charged by the bank that owns the ATM. USAA, if you qualify for an account, and Charles Schwab are two such banks. For other banks the fee charged could be a flat amount, such as TD Bank’s $3 fee per withdrawal, a percentage of the withdrawal amount, such as Ally Bank’s 1% per withdrawal, or a combination, such as Chase Bank’s fee of $5 plus 3% of the withdrawal amount. This fee is separate from any fee charged by the bank that owns the ATM.

Purchasing Foreign Currency From Your Local Bank

One option for obtaining foreign currency before you travel would be to purchase currency from your local bank. Not all banks will offer this option, and each bank that does sets their own exchange rate. This rate is often worse than the direct rate offered by Visa or MasterCard, typically by around 5%. Aside from the worse exchange rate, banks will often charge an additional shipping fee to deliver the foreign currency to your home or a local branch of your bank.

This option is typically only available if you have an account with the bank in question. For example, Wells Fargo and Bank of America both offer foreign currency purchases, but they require you to pay with your associated checking or savings account. With the exchange rate being approximately 5% worse and an added shipping fee, it might seem like a bad idea to purchase currency. However, it could be necessary or just extremely convenient, depending on your plans when you arrive. For example, if you are arriving in a country via cruise ship or over land rather than flying, there may not be a convenient ATM. Having cash on hand when you first arrive can be invaluable, both to save time and in case you need cash before being able to find an ATM.

Using a Dedicated Currency Exchange Service

The last option we will discuss is to use a dedicated foreign currency exchange service. You can find these in almost all major airports, and as such it can be the most convenient option if you find yourself needing foreign currency on very short notice. Unfortunately, this convenience comes at a cost; these services often have the worst exchange rates you will find. Travelex is one of the largest and most well known exchange services. Based in London with over 1,500 stores across 27 countries; you can almost always find a Travelex. The rates are often 10-15% worse than the rate offered by the banks, along with an additional processing fee.

Sample Exchange Rates

Chinese to US Currency

Below is a table showing the exchange rates and fees for the different options discussed above. These rates were taken as of September 20th, 2017, and show the cost of purchasing 20,000 Japanese Yen using each option. For Visa and MasterCard, we assume that you have a card that does not charge a foreign transaction fee.

Exchange Rates – USD to JPY – Sept. 20, 2017
Master Card Visa Bank of America Wells Fargo Travelex
Exchange Rate 1,000 Yen = $8.98 1,000 Yen = $8.99 1,000 Yen = $9.44 1,000 Yen = $9.47 1,000 Yen = $10.10
Cost Before Fees $179.71 $179.88 $188.80 $189.54 $202.05
Fee $0 $0 $7.50 $15 $10
Total Cost $179.71 $179.88 $196.30 $204.54 $212.05

10 Amazing Animal Encounters


One of the wildest experiences you can have when travelling the world is getting to see local wildlife up close and personal. Zoos and aquariums can be a great way to see a wide variety of animals, but sometimes there is an even greater adventure out there waiting. We have gathered together 10 of the best animal encounter vacations you can plan today. It is very important to note that some tour companies who offer animal encounters do not care for the welfare of the animals. All of the excursions we feature are responsible, and this list will be updated if any of these activities no longer meet that criteria.

Animal Encounters in North America

1. Polar Bears Under the Northern Lights – Churchill, Manitoba, Canada
Polar Bear Mom and Cubs
Churchill Wild | Great Ice Bear Adventure

Churchill Wild operates four remote, fly-in ecolodges in Manitoba, Canada. Two of their lodges, Nanuk Polar Bear Lodge and Seal River Heritage Lodge are members of the esteemed National Geographic Unique Lodges of the World collection. All four of their lodges are remote and their tour packages include transportation to Winnipeg, then Churchill, and finally a scenic flight to the lodge.

Between the four lodges, Churchill Wild offers 9 unique polar bear safaris. All have a chance to see the Northern Lights and many polar bears, as well as a wide variety of arctic wildlife. Aside from polar bears you can see Beluga whales, wolves, black bears, moose, caribou, foxes, and hares. Tour packages range from 7 to 11 days, and start at $10,000 CAD per person, although that is almost all inclusive. The season lasts from July to November each year.

2. Salmon Fishing with Brown Bears – Katmai National Park, Alaska
Grizzly Bear with Salmon
Dmitry Azovtsev | Wikimedia | daphoto.info

Katmai National Park and Preserve is a 4 million acre park filled with volcanoes and a wide variety of Alaskan wildlife. Most famous of all the wildlife in the park is the Alaskan Brown Bear. Every year in July and September hundreds of bears flock to the Brooks River to feed on Sockeye salmon.

The park is only accessible by float plane, landing at Lake Brooks Seaplane Base. Flights are available from Anchorage, Homer, King Salmon, Kodiak, and a few other towns in Alaska. Lodging options in the park are limited to a few lodges or camping. Brooks Lodge is the most popular destination in the park, and the best place to bear watch. The National Park Service even has a number of webcams setup, so you can bear watch from your home.

For more Alaska adventure ideas, check out our review of our first Alaskan cruise.

3. Bike with Gators – Shark Valley, Everglades National Park, Florida
Alligator at Shark Valley
Shark Valley | January 13, 2017

When visiting the Everglades one of the most popular wildlife tours is taking an airboat ride. Unfortunately, the loud and rough airboats can have negative impacts on the local wildlife. As a result, the National Park Service has been instituting restrictions on the number of airboats and where in the park they can go. If you want a chance to see the famous alligators of the everglades up close while maintaining the peaceful atmosphere, your best bet is the Shark Valley Trail.

Shark Valley Trail is a 15 mile paved loop with a number of walking trails and an observation tower. You can take a tram ride, rent a bike, or walk the trail, all while in the company of hundreds of alligators and a wide variety of birds. The trail is flat, and a very enjoyable experience no matter how you choose to see it.

Royal Caribbean Panama and Costa Rica Cruise

** UPDATE ** – Royal Caribbean has announced changes to cruises on the Enchantment of the Seas. Unfortunately, this cruise has now been cancelled. Details can be found here.

The stunning views that await you in Costa Rica

Hello adventurers! We have some really exciting news for you today. Royal Caribbean has just released a 9 day cruise itinerary that visits both Panama and Costa Rica. This is currently the only cruise offered by Royal Caribbean that visits Costa Rica, and one of only three that visits Panama. This sailing departs Galveston, Texas on November 7th, 2018 and returns on November 16th. Along the way you will stop in Puerto Costa Maya Mexico, Colon Puerto Rico, Puerto Limon Costa Rica, and Cozumel Mexico. Even better, the current price of this cruise starts at only $619 per person. At 9 nights, this comes down to less than $69 per person per day. This cruise was just announced and prices won’t stay this low for long!

The Itinerary
Date Time Location
Nov. 7, 2018 4:00 PM Galveston, TX
Nov. 8, 2018 All Day At Sea
Nov. 9, 2018 12:00 PM – 6:00 PM Puerto Costa Maya, Mexico
Nov. 10, 2018 All Day At Sea
Nov. 11, 2018 11:00 AM – 8:00 PM Colon, Panama
Nov. 12, 2018 7:00 AM – 4:00 PM Puerto Limon, Costa Rica
Nov. 13, 2018 All Day At Sea
Nov. 14, 2018 10:00 AM – 6:00 PM Cozumel, Mexico
Nov. 15, 2018 All Day At Sea
Nov. 16, 2018 7:00 AM Galveston, TX
Enchantment of the Seas

This cruise is on the Enchantment of the Seas, which is part of Royal Caribbean’s Vision Class. The Enchantment is one of the smaller ships in Royal’s fleet with a capacity of 2,446 passengers. While that means it does not have the “mega-ship” feel of the newest ships, it is also significantly less crowded. Enchantment has less than half the maximum number of passengers compared to the newest Quantum of the Seas and almost one third the passengers as the current largest ship, Harmony of the Seas.

While aboard Enchantment you will enjoy a variety of activities including bungee trampolines, rock climbing, theater shows, and pool-side movies. There are three saltwater pools on board, including an adults only Solarium, and an additional splash pool for kids. For dining, you have the free main dining room or Windjammer buffet, as well as the premium Chops Grille, so you will never go hungry.

The Ports

Poas Volcano in Costa Rica

Over 9 days this cruise visits four ports and has four sea days. Cozumel and Puerto Costa Maya are both excellent ports that a lot of ships frequent, but the real highlight of this sailing are the stops in Panama and Costa Rica. You will spend nine hours in Colon, Panama, plenty of time to see the canal or the capital, Panama City. Unfortunately, this sailing does not transit the Canal, but that is partially why it is such a great bargain. Ships travelling through the Panama Canal have to pay a tax based on the size of the ship. This typically adds approximately $150 to $250 per passenger, a significant increase.

The day after leaving Panama you will spend another 9 hours in Puerto Limon, on the Costa Rican coast. I had the pleasure of spending a day in Limon in 2004, and I still remember the stunning beauty today. While in port there is so much to do. You can explore Veragua Rainforest or the Tortuguero Canal if you enjoy nature. If beaches are more your style there are miles of pristine coastline to explore. If history is more your forte, you can plan a trip to Isla Uvita, where Columbus landed on his last voyage across the Atlantic. There is a reason Costa Rica’s motto is Pura Vida or Pure Life and all it takes is one visit to understand.

Ready to Book?

While November 2018 seems far away, this is an extremely unique cruise for Royal Caribbean. We do not expect this price to last for long, and it is even possible for cabins to start selling out soon. All that you need is a $250 deposit per person to reserve your spot on this amazing adventure. We also offer a lowest price promise; any price drops between when you book and when final payment is due will be honored. If you book today, you will be locked in at the best possible price for this stunning itinerary.

Reach out to us and start planning your adventure today!

Searching Multiple Airports With Google Flights

There are several tools that can help the discerning adventurer make the most out of their travel budget, but when it comes to finding the best deal on flights there is perhaps nothing more powerful than Google Flights. This is the second in a series of articles highlighting the various tools and techniques that you can use in Google Flights to get the best possible price on your next adventure. Today, we will be focusing on how to use Google Flights to search for airfare from multiple airports. You can also see the other tips and tricks for using Google Flights like a master below.

  1. Using the Low Fare Calendar to Find the Bet Days to Fly
  2. Search Multiple Airports to Get the Best Deal
  3. Explore Destinations to Decide Where to Fly (Coming Soon)
  4. Tracking Flight Prices to Know When to Book Your Ticket (Coming Soon)

We have already seen how Google Flights can help you pick when to take your next vacation. However, when you take your vacation is not always so flexible. Maybe you are taking a cruise, going to a wedding, or have limited days when everybody can take time off. In these situations the Low Fare Calendar loses much of it’s usefulness. Still, being flexible is a great way to score a deal, and searching multiple airports could be the key. To learn how to master this skill, watch our video below or keep reading.

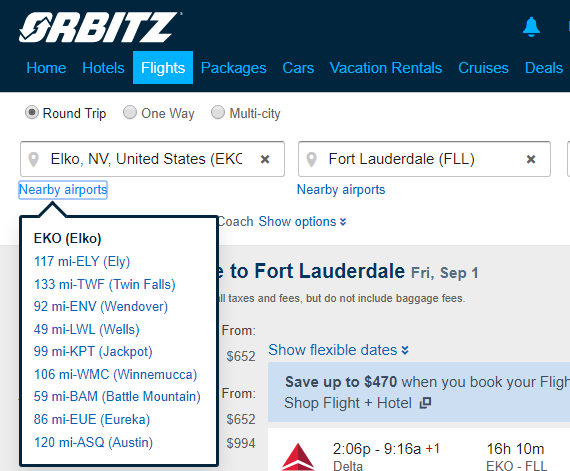
Many online travel tools allow you to search airports that are near your home, but they are typically very limited. For example, Orbitz gives you a dropdown with a list of up to ten of the closest airports. This list could include small, general aviation airports that have no or very few commercial flights. There is no easy way for you to specify a list of airports that you are willing to travel to or from.

The list of nearby airports as provided by Orbitz
Orbitz lists the closest airports by proximity with no option to customize
Searching Multiple Airports With Google Flights

When using Google Flights on the other hand, searching multiple airports for the best deal is as easy as listing the airports. In both the departure and arrival fields you can list as many airport codes as you like, separated by commas. The first airport that you enter will auto-complete, but after that you need to know the code for each airport you want to consider. If you are unsure on an airport code, just list that city first and let Google auto-complete. If you are unsure on multiple airports you can find several resources online by searching for “IATA Airport Code Lookup.”

Comma Separate Multiple Airports on Google Flights
Just list the airports you want to consider, separated by commas

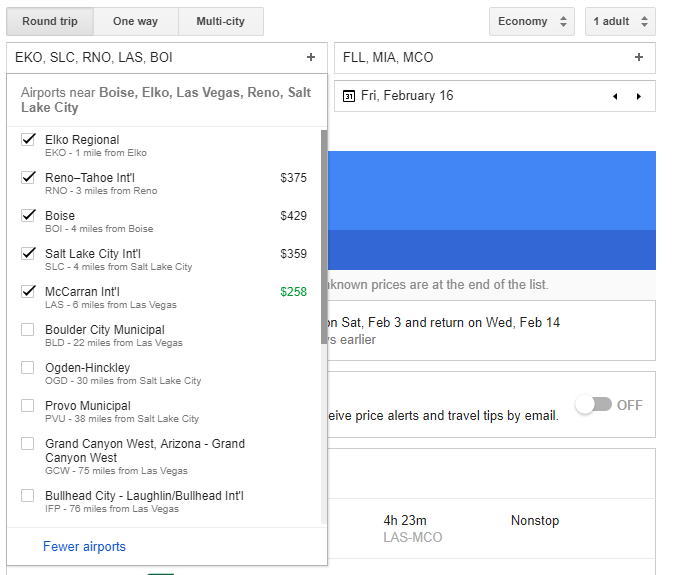
You can also click the ‘+’ sign in the airport text box, or select “Nearby Airports” in the airport dropdown. Doing this will provide a list of airports by distance similar to the list provided by Orbitz, but with two large benefits. First, Google takes into consideration all the airports you have already entered. Second, each airport has a checkbox, so you can select as many of the airports as you want.

List of nearby airports provided by Google Flights
Selecting “Nearby Airports” gives you a list of airports close to any airport you have already entered.
Finding Multiple Airports Using the Map

While knowing the airports you want to consider or being able to find a list of nearby airports can be great, sometimes it’s more beneficial to be able to see the airports. Google Flights has you covered in that department as well. At the top of the flight search page, just to the right of the date and airport selections, is a map. You can quickly see the destination airports you have chosen on this map, but it’s real strength shows when you click on it.

The Google Flights Destination Map
Just to the right of the airport and date selections is a map showing your destination(s).

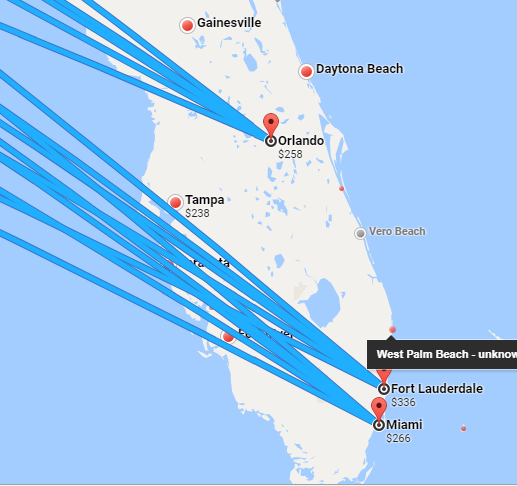
When you click on the small map you are taken to a page with a fully functioning Google Map. This larger map shows all airports as red points, and you can hover over them to get the airport name. You can zoom in and out and pan the map, and many of the larger airports will have the price for your flight dates displayed. Clicking on an airport will reset your destination to the selected airport. You can then see the cheapest flights to that airport on the left of the screen. You can also quickly see any airports that don’t have available flights, as their pins will be gray. This could help you find additional airports you didn’t originally consider, or eliminate airports that are too far away.

A Google Map displaying airport locations
Google Flights also has a full size map showing all airports with available flights.
Limitations of Google Flights for Multiple Airports

While Google Flights is extremely powerful and useful, it does have some downsides. First, when searching for multiple airports you have to have exact dates. There is currently no way to combine either flexible dates or the extremely powerful Low Fare Calendar with multiple airports. Also, additional airports after the first don’t auto-complete, so you need to know the airport codes you want to consider. The map can only be used to select a destination airport, and overwrites any currently selected airports. This means that there is no way to use the map to select multiple airports, or change your departure.

It is also important to note that while this can help you get the best deal on airfare, there are other costs you must consider. Driving to an airport further away can require gas, time, and parking or rental car fees. You also need to be mindful of timezones if you book a flight from an airport in a different state. If you want some help planning an adventure, reach out to us today.

Using Google Flights Like a Pro: The Low Fare Calendar

There are several tools that can help the discerning adventurer make the most out of their travel budget, but when it comes to finding the best deal on flights there is perhaps nothing more powerful than Google Flights. This is the first in a series of articles highlighting the various tools and techniques that you can use in Google Flights to get the best possible price on your next adventure.

  1. Using the Low Fare Calendar to Find the Best Days to Fly
  2. Search Multiple Airports to Get the Best Deal
  3. Explore Destinations to Decide Where to Fly (Coming Soon)
  4. Tracking Flight Prices to Know When to Book Your Ticket (Coming Soon)

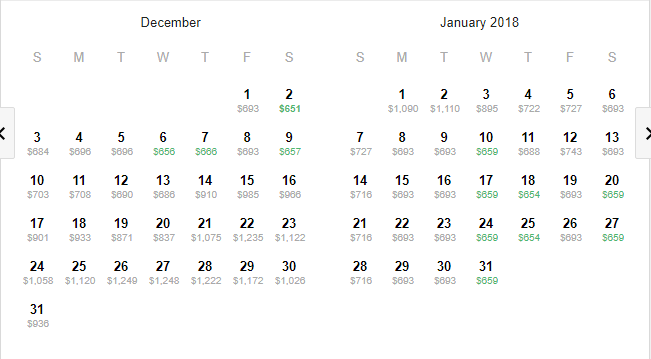
Today we will be discussing the Low Fare Calendar feature, a tool that allows you to quickly see the best priced flight each day between two airports for the next 11 months; as far out as airlines publish their fares. This is perfect if you know where you want to travel to, but are flexible as to when you actually go. One great example might be if you wanted to visit Hawaii sometime in the winter, or perhaps you have just always wanted to visit Paris and do not care when you visit, as long as you get a great deal on the airfare. Watch the video below or keep reading for a detailed tutorial showing how to make the most out of this powerful tool, and how to never overpay for your flights again.

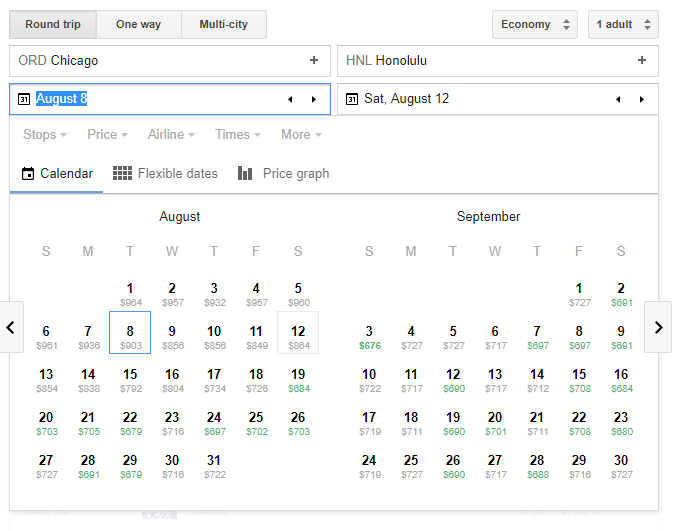
You can find the calendar on the main Google Flights page. Just enter your departure and destination airports (it will autocomplete for you if you do not know the airport codes), and then click on the departing date field. Once you click on this field a calendar will appear on the screen as seen below.

Low Fare Calendar Screenshot
The Low Fare Calendar when searching for a flight on Google Flights
How to Use the Low Fare Calendar

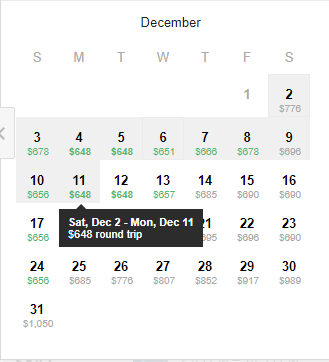
Once the calendar is open you can use the arrows on either side to navigate between months; the full range of dates available can vary but typically goes out approximately 10-11 months in the future. For each day Google lists the price of the cheapest flight, and the days with the cheapest rates will have their price highlighted green. This makes it really easy to see at a glance which days have the best possible rates. The overall lowest price found will be bold as well as green; you can see an example of this by looking at December 2nd in the screenshot below. Once you select a departure date by clicking on it in the calendar, the prices will update to show you the cost of a round trip ticket that returns on each day after your departure date.

Low prices are marked in green
Lower than average prices are marked in green, while the absolute lowest price is a bold green.

It is important to note that once you select a departure date you might find round trip flights that are even cheaper than what the calendar originally showed. This is because Google uses the currently selected dates to determine how long of a trip you are planning. In this example, the original dates before I started looking at the calendar defaulted to August 8th to August 12th, or 4 days. That means that the calendar will display round trip prices assuming a four day trip, so the price displayed for December 2nd was the return flight on December 6th, or 4 days later. If you know how long you want to be away you can change the original dates to anything that matches your preferred duration. For example, if you want to spend two weeks in Hawaii, you can change the return date to August 22. This will make the calendar pull prices assuming a 2 week trip.

Calendar of Return Flight Fares
The Low Fare Calendar showing what it would cost for a round trip ticket given a specific departure day.
Viewing Flight Details

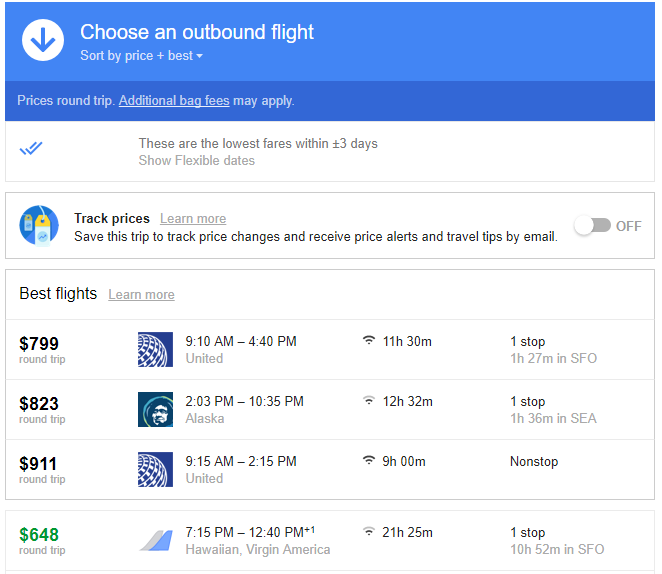
After selecting a departure and return date you will be redirected to a page detailing the different flight options that match your selection. Here you will see a list of the best flights for your dates followed by the remaining flights ordered by price. As we can see below, the cheapest flight is almost 22 hours long, thanks to an 11 hour layover. We also see that this is an overnight flight, arriving the next day.

List of specific flights and details
A list of flights available on our chosen dates.

Congratulations, you have now used Google Flights to find the cheapest flight available. However, the calendar also has a number of filtering options that you can use to find the absolute perfect flight.

Filtering Results to Find the Perfect Flight at the Perfect Price

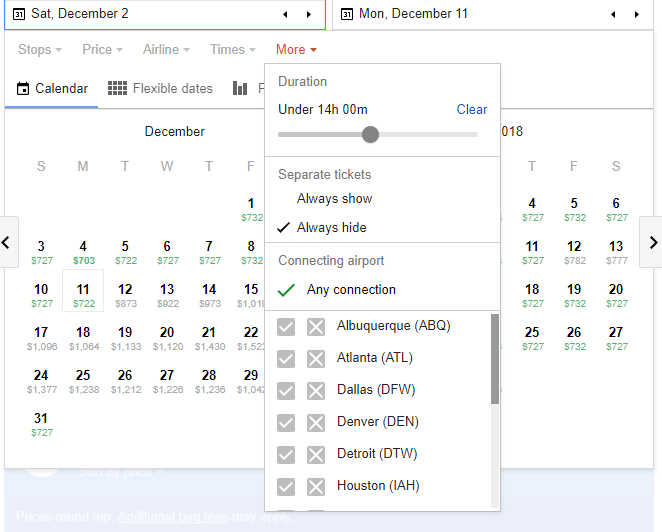
Now we have found the cheapest flight from Chicago to Honolulu this winter, but I don’t like that long layover. Thankfully, the Low Fare Calendar also works with all the filtering options so we can choose a shorter duration. Just below the date selection boxes, we see 5 filter options; Stops, Price, Airline, Times, and More. Under each of these you have several filters you can set based on your personal preferences. Under “Stops” you can choose to only see nonstop flights; “Airline” lets you choose a specific airline or alliance. You can even exclude airlines if there are specific lines you do not want to fly. “Times” allows you to specify when you want to leave or arrive at your destination, and duration is under “More”. You can also exclude any specific connecting airports if there is an airport you do not want to travel through.

I am going to restrict my flights to those that take less than 14 hours from departure to arrival. I can do this by clicking on the “More” heading and dragging the slider bar until it says 14 hours. Once I do this, the calendar will automatically update it’s prices. Now I can see that the cheapest price has changed from $648 on December 2nd to $703 on December 4th. It’s $55 more per person, but at least I know I won’t be stuck in an airport for 11 hours.

Filters available on Google Flights
The filtering options available include number of stops, price, airline, times, duration, and connecting airport
Putting it All Together

If you know where you are travelling to, the Low Fare Calendar on Google Flights is a powerful tool. Combined with the other tools available on Google Flights, you can be sure that you get the best deal. Make sure to use the filters to your advantage and you’ll be able to quickly find the perfect itinerary. Finally, if you would like assistance or want information on an entire vacation, send us a request here. You can also call us at (800) 307-2457 and we’d be happy to help.