There are several tools that can help the discerning adventurer make the most out of their travel budget, but when it comes to finding the best deal on flights there is perhaps nothing more powerful than Google Flights. This is the first in a series of articles highlighting the various tools and techniques that you can use in Google Flights to get the best possible price on your next adventure.
- Using the Low Fare Calendar to Find the Best Days to Fly
- Search Multiple Airports to Get the Best Deal
- Explore Destinations to Decide Where to Fly (Coming Soon)
- Tracking Flight Prices to Know When to Book Your Ticket (Coming Soon)
Today we will be discussing the Low Fare Calendar feature, a tool that allows you to quickly see the best priced flight each day between two airports for the next 11 months; as far out as airlines publish their fares. This is perfect if you know where you want to travel to, but are flexible as to when you actually go. One great example might be if you wanted to visit Hawaii sometime in the winter, or perhaps you have just always wanted to visit Paris and do not care when you visit, as long as you get a great deal on the airfare. Watch the video below or keep reading for a detailed tutorial showing how to make the most out of this powerful tool, and how to never overpay for your flights again.
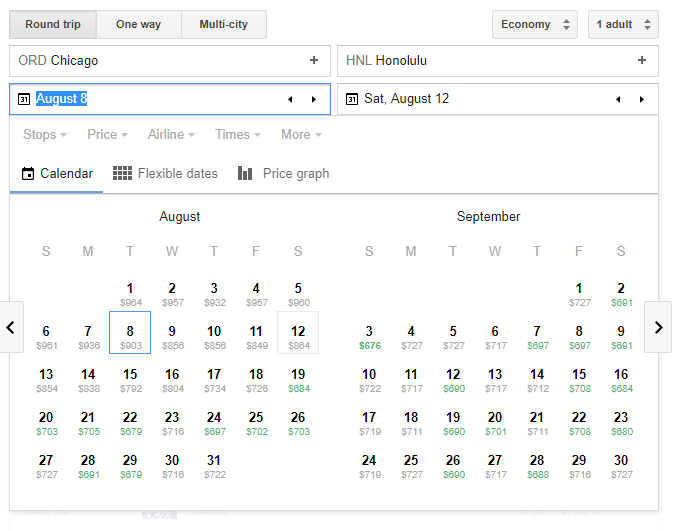
You can find the calendar on the main Google Flights page. Just enter your departure and destination airports (it will autocomplete for you if you do not know the airport codes), and then click on the departing date field. Once you click on this field a calendar will appear on the screen as seen below.
In This Post
How to Use the Low Fare Calendar
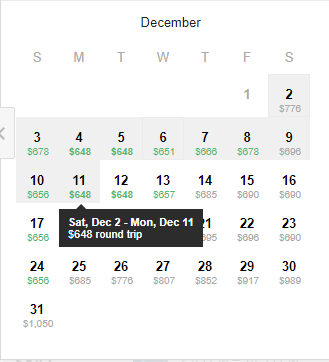
Once the calendar is open you can use the arrows on either side to navigate between months; the full range of dates available can vary but typically goes out approximately 10-11 months in the future. For each day Google lists the price of the cheapest flight, and the days with the cheapest rates will have their price highlighted green. This makes it really easy to see at a glance which days have the best possible rates. The overall lowest price found will be bold as well as green; you can see an example of this by looking at December 2nd in the screenshot below. Once you select a departure date by clicking on it in the calendar, the prices will update to show you the cost of a round trip ticket that returns on each day after your departure date.
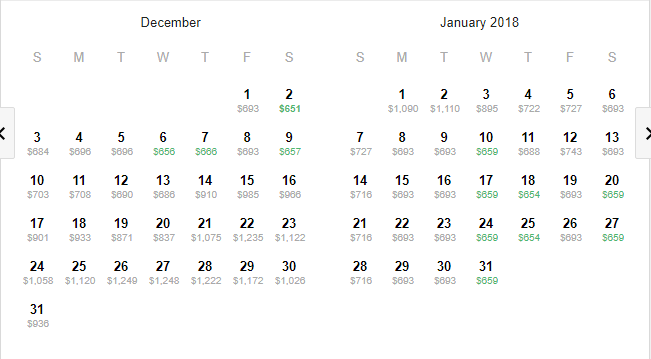
It is important to note that once you select a departure date you might find round trip flights that are even cheaper than what the calendar originally showed. This is because Google uses the currently selected dates to determine how long of a trip you are planning. In this example, the original dates before I started looking at the calendar defaulted to August 8th to August 12th, or 4 days. That means that the calendar will display round trip prices assuming a four day trip, so the price displayed for December 2nd was the return flight on December 6th, or 4 days later. If you know how long you want to be away you can change the original dates to anything that matches your preferred duration. For example, if you want to spend two weeks in Hawaii, you can change the return date to August 22. This will make the calendar pull prices assuming a 2 week trip.
Viewing Flight Details
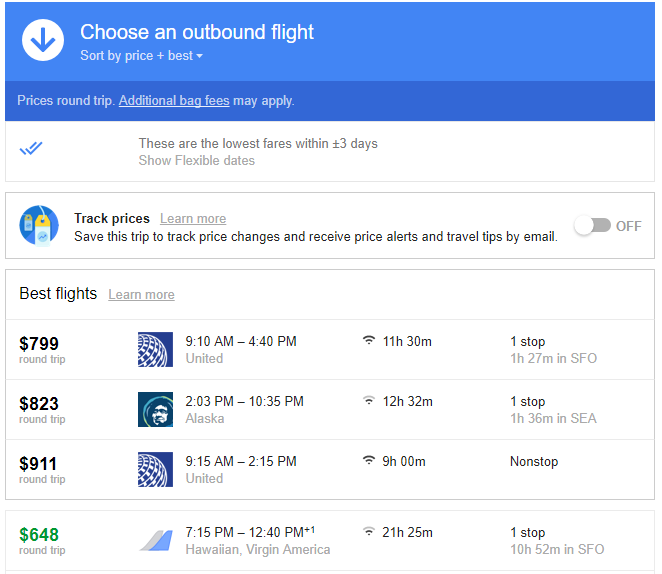
After selecting a departure and return date you will be redirected to a page detailing the different flight options that match your selection. Here you will see a list of the best flights for your dates followed by the remaining flights ordered by price. As we can see below, the cheapest flight is almost 22 hours long, thanks to an 11 hour layover. We also see that this is an overnight flight, arriving the next day.
Congratulations, you have now used Google Flights to find the cheapest flight available. However, the calendar also has a number of filtering options that you can use to find the absolute perfect flight.
Filtering Results to Find the Perfect Flight at the Perfect Price
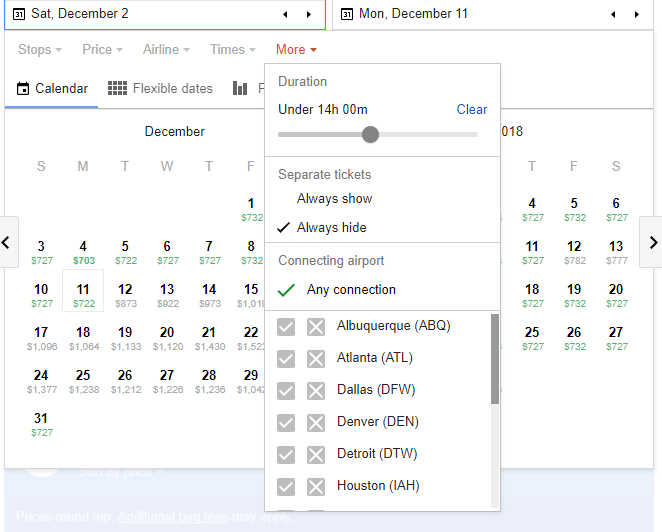
Now we have found the cheapest flight from Chicago to Honolulu this winter, but I don’t like that long layover. Thankfully, the Low Fare Calendar also works with all the filtering options so we can choose a shorter duration. Just below the date selection boxes, we see 5 filter options; Stops, Price, Airline, Times, and More. Under each of these you have several filters you can set based on your personal preferences. Under “Stops” you can choose to only see nonstop flights; “Airline” lets you choose a specific airline or alliance. You can even exclude airlines if there are specific lines you do not want to fly. “Times” allows you to specify when you want to leave or arrive at your destination, and duration is under “More”. You can also exclude any specific connecting airports if there is an airport you do not want to travel through.
I am going to restrict my flights to those that take less than 14 hours from departure to arrival. I can do this by clicking on the “More” heading and dragging the slider bar until it says 14 hours. Once I do this, the calendar will automatically update it’s prices. Now I can see that the cheapest price has changed from $648 on December 2nd to $703 on December 4th. It’s $55 more per person, but at least I know I won’t be stuck in an airport for 11 hours.
Putting it All Together
If you know where you are travelling to, the Low Fare Calendar on Google Flights is a powerful tool. Combined with the other tools available on Google Flights, you can be sure that you get the best deal. Make sure to use the filters to your advantage and you’ll be able to quickly find the perfect itinerary. Finally, if you would like assistance or want information on an entire vacation, send us a request here. You can also call us at (800) 307-2457 and we’d be happy to help.

I’m bookmarking this site.
Me too Raymond. I’m bookmarking this site. You’re a superstar Anthony, thank you! ^^